

How to Install a Flexible Flue Liner for a wood burning stove
This is a real life "installing flexi flue liner" job, warts and all, not just the well-rehearsed and often reapeted theory. I looked on-line for “best practice” and found very little that makes total practical or justifiable sense. So the following is how we did it, plus explanations of the reasoning behind why things are done in a particular ways. Please vist the iDoStuff blog if you have any comments or questions.
See here, for more about the flue liner cost, materials used and installation cost.
For more about how I answer the question “Is a wood burner worth it?” Start here
Chimney Flue Lining Installation Video
The video give gives an overview of how to install a flexible flue liner. The notes below give more details about the stages and discussion about alternatives.
note: I have since researched, in to what problems might be caused by not sealing the top of the liner to the plate. The previous page details why, on balance, I would now suggest using a pot hanger cowl instead of the plate and clamp method.
1. Preparation of the chimney stack and opening
Often fireplaces have been bricked up so it’s time to get out the chisel and lump hammer (or a breaker if you have one. Check first if the lintel or arch is in good condition before you knock out anything that may be giving structural support. With a bit of luck after a few bags of rubble, muck and soot you can move on to checking and sweeping the flue. If it looks like you might need some remedial work doing have a look at how I’ve had to deal with fireplace openings in very poor condition.

A problem you might encounter is rubble blocking the flue. This may be just stuff that been chucked down or it could be the “feathers” between adjoining flues that have collapsed. In either case these need to be cleared. If you can’t dislodge a blockage from below (being careful that nothing drops on you) then you’ll need to take a few bricks out of the stack at the level of the blockage.
A clear chimney flue will just need a good sweep, making it less of a messy job installing the liner and so it doesn’t fall down in the years to come. Any condensation in the flue will also react with soot producing chemicals that aren’t good for the bricks and mortar.
2. Inserting a Flexible Flue Liner
This can be done from the top and feed down or from the bottom and pulled up. Choose which way you want to go.
Pulling the flexi flue up was easiest for us the factors to consider are:
Pulling up – Pros. You don’t have to carry the liner up the ladders or handle it when you might be a bit short of safe balancing and manoeuvring space.
Cons. As shown in the video you might have to twist the liner to get it past any little ledges and it can be a help if the liner is straightened as you feed it in both are easier to do in the unrestricted outside. Pulling up is can be difficult if the pot is still on and resting on slates or packers under the pot the nose cone might help it get past these but it could be tricky to reach down and pull the nose around.
Pulling down- Pros. You can spin the flue around so the head points in different directions, making it easier to clear ledges or go around bends. It’s easier to straighten the liner as you feed it down.
Cons. You have to carry the flu up and handle it at height.
Either way a rope needs fixing to the right end of the flue. There should be arrows on the flue liner that indicate UP. It’s important that the edges of the spiral of steel on the inside are facing down, if they face up they will trap condensate and encourage build-up of tar. So now you know which end to attach the nose cone with a few wraps of strong tape. If you haven’t got a nose cone you can cobble together a bridle from rope so the pulling rope is central to the liner.
On ours, I had to add piece of cable as the hole was too small to fit the rope. And if you’ve watched the video, it doesn’t have to be a falconers knot any old knot will do!
The liner should be fed in gently so it doesn’t get damaged and the rope puller in good communication with the feeder. The video demonstrates how good communications could make the operation a bit smoother.
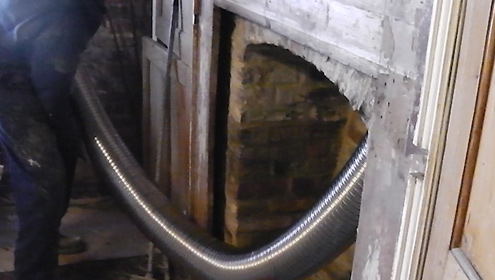
Once in don’t drop it! Tying it up will save any embarrassing slips.
3. Securing the top of the flue liner
If using method “A” (a choice described here) then it’s just a matter of fitting the pot hanger cowl.
 Method “B” uses a top plate and clamp. The plate goes over the liner and rests on the brick work and the clamp is tightened on the liner about 2” 50mm down from the top.
I had purchased a top sleeve this is supposed to go in the liner and stop the it being distorted or crushed. We found this didn’t work, the sleeve outside diameter was a very sloppy fit in the liner so as the clamp was tightened the flue liner began to distort before the sleeve was gripped. At 3” 75mm down from the top the liner has plenty of structural strength to take a tight grip from the clamp without the sleeve.
We bent the ends of the clamp around with a pair of pliers to so the pot could sit down fully on the top plate. (This is something I’ve not seen mentioned anywhere else). But the top plate is thin steel and can be flexible. It is important to make sure the top plate is well supported on the brickwork or as we had to do with some additional steel bars under it.
The other way I’ve seen the same components used is with the clamp ends set in to the mortar joints at the top of the stack with the top plate going above the clamp. This does seem a little excessive to me. I’ve also read some advice saying the liner should extend up in to the pot by a third of the pot height. If anyone knows a reason for this advice please let me know over on the blog.
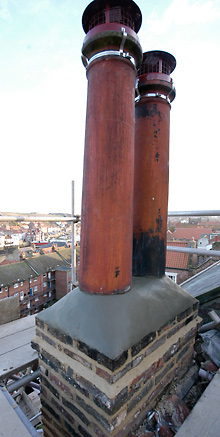
 4. Refitting the chimney pot
The pot can know be refitted. Using various bits of slate on a bed of mortar, first across the stack corners to support the pot then various bits to pack it out and get the pot vertical. The cowl was fitted at this stage so we wouldn’t be shifting the pot after it had been mortared and flaunched on.
We used a stiff mix of normal sand and cement 4:1, although some would recommend a water proofing add mix, Trevor and Terry are confident that the well troweled surface is what’s important.
You can also see on the video the addition of some lumps of rubble and bits of brick. These where added to bulk out the flaunching without increasing the volume of mortar that would otherwise be prone to shrinkage and cracking . On a normal pot this may not be necessary but ours are around five feet tall and need flaunching up to around 10” 250mm high.
The flaunching should have a good slope but be curved (bull nosed) to both the pot and the stack so the edges aren’t feathered down to a weak, thin edge.
I also read some advice to fill the gap between the liner and the inside of the pot with mortar. The reason given is to stop water building up and dribbling down the outside of the liner. This could be possible with a short pot that you can reach inside to trowel the mortar but still a tricky job to get right. The chances are that you would end up trapping more water at the base of the pot causing even greater problems with freezing and a build of a chemical soup trapped against both the pot and liner. I decided it is better for any water that gets past the cowl can drain through the gap between the liner and the top plate. This gap also provided some ventilation to the stack, allowing any moisture to evaporate out hopefully before moisture causes problems to the masonry stack.
So that’s it Flue liner fitted I’ll be showing how to fit the register plates and install the fires soon…
A big thanks to Trevor and Terry who put up with my filming. If you need a builder in or around Whitby these guys come highly recommended by myself and other customers we’ve talked to. They are happy to work on conservation grade jobs, experienced with lime etc. If you’re in need of a builder in the Whitby area and would like to get in touch please leave a comment on the blog (no personal details in the message to avoid you getting spam), I’ll email their phone number over to you.
Any Questions or Comments? please leave them over on the blog
See here for more about the selection of flue liner components used and installation cost.
For more about Log Burning Stoves "Living with a wood burner, are they worth it?" please start here
Various other information and details about the Whitby Cotage renovation here