

Chimney Jenga – scary repairs at the Whitby Cottage
We thought we had found all the big things that needed sorting, roof, floors etc. But there was still a bit more stripping out to do. Taking out or off anything that might cause the building problems or that couldn’t be repaired, or that needed changing to make rooms workable.
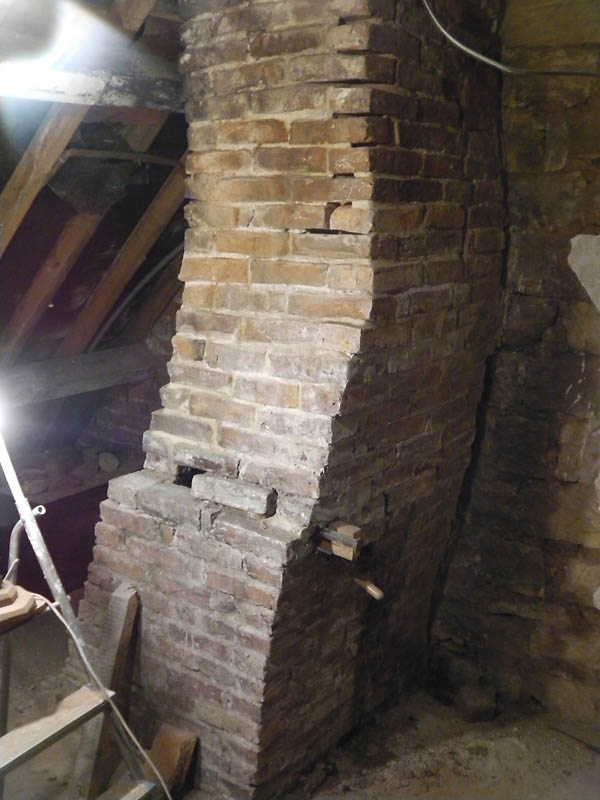
 Under this last category came a small section of Lathe and Plaster wall that was in front of the chimney in one of the attic rooms. Taking it out would make a big difference to floor space because it also covered the alcoves. With that stripped away I could assess the state of the lime plaster on the stack. (So it was, at some point, part of the room before it was hidden away.) The plaster was falling away in parts and soft in other parts so it need stripping. What this early layer was hiding gave me a bit of a shock.
We previously thought the stack might have moved away from the wall judging by the infill we could see down stairs. Upstairs in the attic the full extent was revealed. Not only had the stack pulled away from the wall it had split. And rather than fixing it “ye Olde Bodger Builders” had just plastered over the cracks. I traced the problem down to the Bessemer down stairs dropping slightly probably from when the smoke hood and flue had been replaced with a double brick built flue. The stack now has a bit more support from the more recent (Victorian) brick surround that was probably added to take a range.
Time for Brew and side track the encroaching despair. Looking on the bright side it could have been like that for 200+ years. On the other hand the builder (who’ll be doing the roof once we’ve sorted the scaffolding out) is going to be rebuilding the spreading top of the chimney and putting liners down. What might that do to disrupt the precarious structure? It needed sorting so time for a bit of a plan and a lot of action.
I can imagine that, if it wasn’t me doing it, the choice would be to knock it all down and start again. But in the interests of saving as much of the original as possible and saving money (if not time), I devised a way to stabilise and fix the structure.
There were four problems to address. But as the structure was so weak I couldn’t tackle them one at a time they needed doing consecutively.
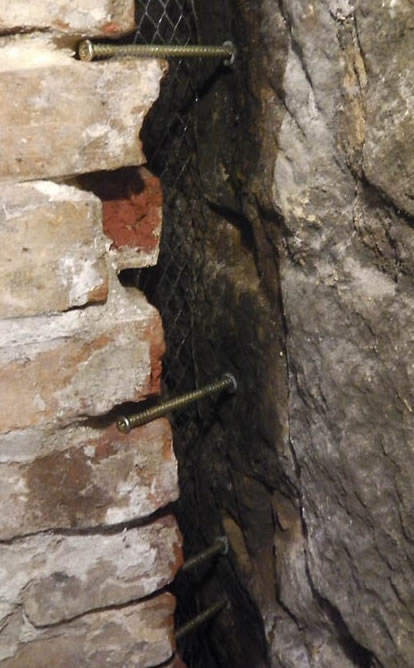 Attaching the stack to the wall. The gap from the stack to stone wall was approximately 3inches. It had been filled in with bits of broken pantiles and very loose, crumbly lime mortar. This wasn’t giving any support to the stack and fell out with the gentlest of prods.
I tackled this by drilling in to the stone and fitting 150mm long screws between many of the brick mortar joints. I raked out the brick and stone joints to about 2 inches. I then pushed in some expanded mesh to the back of the gap, this was to act a former for the next stage.
A stiff mix of NHL 3.5 and Grit Sand (1:3) pushed in to the brick and stone joints up against mesh and around the screws, filled the gap. This has made a solid filling that is attached to the wall and that engages with each brick of the stack. It offers vertical support without making a strong tie back to the wall. I was a little concerned that if I fully tied the stack to the wall, any future movement would start to pull down the wall.
I couldn’t do a full side at once as many of the brick joints were just too weak. The mortar in places had suffered from prolonged damp and was little more than loose sand. So many portions of the brick work need stabilising first. This is a painstaking job involving raking out soft mortar in a few places at a time and re-packing with the grit sand NHL mix. When this is set, some of the adjoining sections can be raked out and packed.
Almost all (80%) of the vertical joints needed doing and about 20% of the horizontal joints need doing to full depth. So it’s a long slow process, the “How to” for replacing mortar joints is here.
 The diagonal crack on the right hand side needed fixing, with at least a few full bricks spanning the crack. To make it even scarier this side of the stack is curved over so it’s making an overhang. The surrounding bricks had to be stabilised (as above). Then with some support packing in some of the crack I could remove enough to fit a couple of whole bricks back in.
 The front of the stack shows where the bottom has moved away from the top. To the point where not a lot of brick was left one on top of another. After stabilising the corners and the bricks above I could remove and reposition the bricks whilst relying on self corbeling to hold the stack up.
More info on brick replacement here
With all this done on the all sides it’s just a case of applying a finish pointing suitable for painting over. I estimate the full job will have taken me about 45 hours (or more), plenty of time to listen to all radio 4’s weekly output and most of the repeats.

Any comments or suggestion, please visit the "Chimney Jenga" Blog post.
Tips and Tricks for repointing with NHL (lime)
Replacing all the mortar in a wall and some of the bricks, info here
and for more about the cottage here's the Full index on the Whitby Holiday Cottage renovation