

Deep Pointing Bricks – Replacing mortar joints
or How to Rebuild a wall without taking it down!
 This a job that only needs doing where the mortar has degraded or has lost adhesion to the bricks. Cracks zigzagging up through mortar joints are best fully raked out and repacked rather than the normal cosmetic cover-up pointing. Where lime mortar has degraded to soft dust it all needs to be renewed if a wall is subjected to any substantial load.
It might be easier to knock down and rebuild the wall from scratch however for some situations there is a less disruptive, although time consuming alternative. If the wall is load bearing and Acro props can’t be used or the ethics of restoration dictate repair rather than renew, this technique might come in handy.
First the wall and joints need assessing to determine how much and where mortar can be removed whilst leaving a good margin of safety. To work this out, it’s good to have a understanding of how brickwork self corbels, and how much load the soft mortar can take before its crushed. Also any loads need minimising whilst it’s in a weakened state.
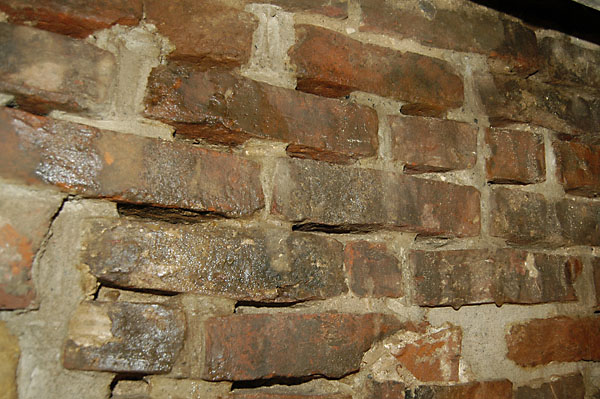
The pictures below give some ideas of how to proceed. The trick is to take out as much as possible but still keep things safe.
“I’s” first. The vertical joints are likely to be weakest as they are probably less well compressed when the wall was built. These can be raked out to full depth and slightly above and below each brick. Only do a couple of square feet (or less) at a time or every other joint if you are concerned about the stability of the wall. The holes can then be repacked with mortar. The full "How To"procedure for deep repointing or packing is explained here.
When the "I's" have fully set it should be safe to rake out the horizontal joints. Please note the "should", it'll be up to you to decide if the integrity of the wall will be compromised at any stage. When these joints have been re-packed with new mortar the wall will have been rebuilt without having been demolished first.
Replacing bricks in old walls
You might have to replace a some of the bricks if they have become damaged or become dislodged. You should stabilise the surrounding bricks first. In the picture below, the corner joints have been renewed as well as the joints of the bricks above.

Taking out one brick at a time from a full, sturdy wall will not cause any problems. However it may be that more adjacent bricks need replacing. How many can be removed depends on a number of factors including loading on the wall, strength of the surrounding mortar and the bricks and how the bricks above will self corbel. So BE CAREFUL.
If you have the time and patience virtually any brick structure in what ever poor condition can be rebuilt.
This tricky job on the Whitby Cottage Chimney took over 45 hrs to complete including fixing the brick structure back to the stone wall. The full Chimney Jenga story is here.
For Tips and Tricks on how to do the actual mortar replacement here's a full "how to repoint brickwork" including the deep repointing used on this job.
Any comments or suggestion, please visit the "Chimney Jenga" Blog post.
and for more about the cottage here's the Full index on the Whitby Holiday Cottage renovation