

Alternative Joist / Beam End Repair
For the conventional type of Joist end repair have a look at this other page.
This is the problem we had with a couple of our Whitby Cottage exposed beams. The beam / joist ends had rotted away due to leaky roof.

The method I choose for repair combines some of the simplicity of using Joist Repair Plates with some of the mechanical advantages of the scarf joint repair and few extra advantages as well.
From the Joist Repair Plates I’ve taken steel as the main structural element. I used two “L” section (angle iron from a old bed frame) welded together, back to back, to form an upside down “T” section. This gives overkill on the resistance to downward forces that bares directly on to the heartwood of the beam, similar to the scarf joint. Plus a good flat area to spread the load of the fixings.

Basic welding gear and metal working is required but ‘T’ section steel can be bought off the shelf. I drilled and filled out a square hole to accept the head of a coach bolt so there wouldn’t be a full bolt head showing. All this I could do back in my workshop so it was just a case of fitting them on site.
After sawing and chiseling away the rotten joist ends I routed out a slot and a flat area so the steel would be slightly recessed.

With a hand chisel I got the slot deep enough and the corners squared off so the steel piece was a good fit. I could then offer up the joist repair ‘T’ plate and mark up and drill the hole for the Coach Bolt.

To add to the overkill on this job I gave the slot and face a generous filling of solvent based “no more nails” or equivalent.

The “T” Plate could then be screwed (4X2” No.10s , did I mention overkill) and bolted up.

I don’t think it’s going to shift BUT…
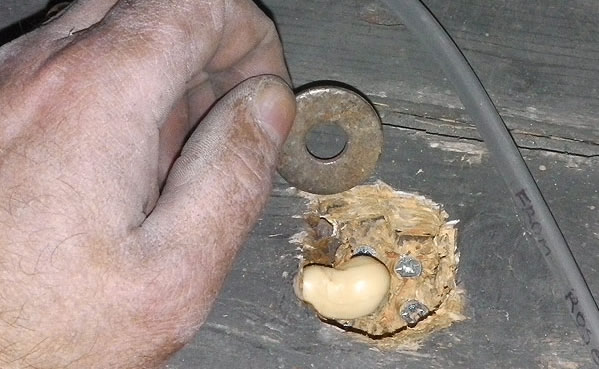
Here’s a tip for bolting potentially soft timber together. (The outer sapwood of old timber can often be quite compressible). Put some screws in around the hole these should be long enough to go through in to the solid timber heart. A large washer will spread the load over all the screw heads and take the clamping force of the bolt straight through to good timber.
All that then remains is to brick up and mortar under and around the ‘T’ piece in the wall for a good solid, permanent fix to the rotten Joist Ends.

The rest is just cosmetic. I’ll make up some side pieces with the corner moulding that can be fitted to replace the missing bit to the wall. Then as the beam is going to be painted I’ll fill in the slight recess to the plate with epoxy filler. If it was to be stripped to a timber finish I could have recessed The ‘T’ plate further and fitted a timber cover.
The final touches will be done when I’m not spending the best of the awful summer on outside jobs.
For more about the Whitby Cottage Renovation/Restoration start here.
Back to conventional joist fixing techniques
Any Comments or Questions about the Joist/Beam mending are most welcome over on the Blog. anywhere for now but I'll have a link here soon