
Opening up a Victorian Arch Fireplace

I should first explain the actual situation: We have, as I’m sure you’ll recognise from the pictures, a fireplace that pre-dates the Victorian period by a long way but it’s got Victorian in there. This is part of a renovation / restoration of a pre- 1650 cottage in Whitby. Our idea is to fit a multi-fuel stove within a recess in the fireplace, to do this involved a big decision relating to all the changes that have happened in the past.
As many people are now opening up old fireplaces and often installing wood burning or multi-fuel stoves, our experience may be useful. If this why your here, you might want to look at our experience of living with a wood burning stove.
Any questions or comments are most welcome over on the blog.
History of the Fireplace

This fireplace has evolved over the centuries as the trends and technology of fireplaces has progressed. We believe the original cottage would have had a central hearth with the smoke drifting up through the thatch as, at this time, there wouldn’t have been a first floor. At some point, maybe in the 1600 hundreds, a smoke hood and chimney was added. The evidence of this is the mantle beam and the brickwork behind and above, although it is possible the original chimney was wattle and daub (We’ll clarify dates after we’ve completed more research). We also think the chimney stack was rebuilt sometime in the 18th century to incorporate a second flue and fireplace for the first floor.
With this early rebuild the hood was possibly bricked down to floor level at the sides and an arch built just below the height of the mantle beam. Then we come to the Victorian bricking in, widening of the breast and the arch lowered to fit a good size range. When the range was removed, the opening was bricked up further for a 20th century fireplace and then a smaller aperture to which the gas fire was fitted.
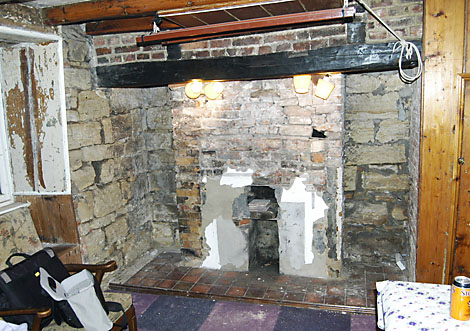
So with all the history it was up to us to decide how far back to “restore” the fireplace. How much history to remove? How much to remain visible? We chose to take it back to the Victorian arch used for the range, this leaves in place any Georgian alterations and all the history beyond the last hundred years.
Restoring the Victorian Arch
The evidence of the arch was visible as soon as cement render was chipped away. The brick work being arched and the steel supporting bar still in place. We could also see the range fixings and some of the original decoration that went around it. It was also clear this arch wasn’t a true arch, it was just cut down bricks in an arch shape supported by the curved steel bar. We had a solid, two course brick column on the left and a rather battered and loose single brick column on the right. Many bricks above the arch were also loose so it would need some careful planning to keep as much of the old chimney from collapsing as the necessary bits where rebuilt.
This planning starts with a careful examination of what is loose and how the self-corbeling of the bricks above will be affected. The plan took advantage of the steel arch and the later infill so I could remove the right hand corner and re-build as a double thickness of brick.

Rebuilding the column would have been straight forward if I had a good supply of matching Georgian bricks. Instead I mixed and matched as I built up and had to cut bricks to tie in with the original courses.

I used Natural Hydraulic Lime (NHL3.5) with 3 parts sharp sand for mortar. A well as being the next best thing to lime putty based mortar for the wellbeing of old bricks, it’s also easy to work with. It stays workable after mixing for much longer than cement but it cures much faster than lime putty so I can get on to the next stages the following day.
Building the Brick Arch
At first glance it could be scary prospect, rebuilding an arch when the wall built on top of it is still there. So it’s worth thinking about how it works in this particular situation and how it could apply in more common situations where an old fireplace opening has been revealed and the arch could do with some repairs.
An Arch in a brick wall only supports a triangle of bricks above it. This self-corbeling of each side will hold the rest of the chimney stack up as long as the two sides of good bricks and sound mortar joints meet at a point. It’s only the bricks below this point which have a chance of falling. So the arch supports a triangle of bricks above it and, as proved by what we had here, the steel bar with just a slight arch, over this span has been enough to support this weight. However to be reliable the brickwork above should be sound and the load spread evenly. The ends of the bar should also be well restrained to stop lateral movement that would allow the arch to flatten out.
Notes about the brick arch and self-corbeling brick here.
So the next part of job was to fulfil the criteria above (sound and even) without having to dismantle any more of the old brickwork than was necessary. Fortunately the bricking in below the arch was providing a former in addition to the steel so I was happy to replace the brickwork without risking any catastrophes. I built a new arch in small stages whilst supporting the bricks above with car jacks.

I used half bricks and a mix 3:1 building sand and NHL. This mix is easier to press in to small gaps between bricks and it is more “squidgy” than using sharp sand. The down side is, it can’t be relied on to hold weight until it has started to cure. The building sand mortar was left recessed so I could point up flush afterwards with sharp sand mortar and then brush back to expose the aggregate and leave the outlines of the bricks showing.

With a new brick arch and all the loose mortar joints raked out and repacked it just needed 12 hours or so for the mortar to harden up before I could take out the infill under the arch.
Notes about the brick Arch and Self-Corbeling Brick
More about the Whitby Cottage Renovation/Restoration start here.
For more information about stove fitting and running cost have a look at our Experience and analysis of running a wood burning stove.
Any Comments or Questions about the fireplace are most welcome over on the Blog.