

How to Fit Reclaimed / Salvaged Cast Iron Railings
Well this how I did it anyway, using as close to traditional techniques as I could, cutting joints and leading. As it's cast iron it can't be welded (easily) and it needs fitting in to stone.
Reclamation Iron Railings – Why?
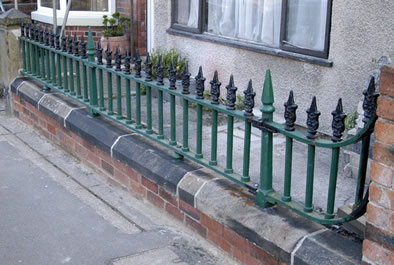
We're on a long term project to renovate / restore our house. The wall we had in front was a hideous early eighties affair, it had to go. But not until we had something to put in it's place. Iron railings are what we wanted but the modern ones just don't have the weight to look right.
Next door (its a semi) has a low wall with stone coping, the original railings where removed during the war. Our house never had a wall as it used to be a shop but next door gives an idea of what's going to look right.
Buying Salvage Cast Iron Railings
The solution came when the chapel up road was demolished. I approached the site manager and came to deal, £200 for 8m including the the coping stones. Another £20 got it down the road slung off an excavator bucket with two of the stones still attached!
As far as can tell this is fraction of the price I would have had to pay from a Salvage yard or Architectural Antiques dealer. I can see now, just how right it looks, the £200 was well worth it. I would happily pay a lot more because of the difference and impact it has.
How these Cast Iron Railings are Assembled
I needed to cut and re-joint sections to fit. So an investigation in to the original panel construction was necessary.

The uprights parts are cast complete with the finials. The top rails are cast with hexagonal holes to fit the uprights. The bottom rails have bosses cast on to take the bottom of the uprights. The uprights are held in the bosses with lead.
Joining Salvaged Cast Iron Railings
The fully assembled panels are jointed at the posts. The top and bottom rails are riveted to lugs on the posts. If any other joints are need they are made by lapping the rails and riveting.

I had to cut one section down, so needed to recreate the original joint.
-
Cut the rails with 9” angle grinder and abrasive blade.
-
Shape the end of the top rail to fit the post, again with the angle grinder
-
Drill the rails to fit the holes in the post lugs. This takes some doing, first with a pilot hole then opened up to 11mm. The surface is hard and took a couple of drill sharpenings but the inside of the rails was softer.
-
I've not got the tackle or rivets to do a perfect reproduction. Instead, I've bolted the sections together. I did however shape the bolt heads to match the originals. It will take some noticing after it's been painted up.
The easiest way to separate an original joint is to drill out the rivets and carefully tap the joint apart.
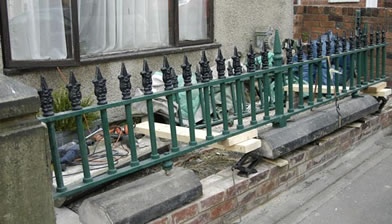
Fitting Iron Railings to a Wall or Post
In keeping with the traditional methods the rails are fitted into mortises cut in to the stone. These have to be deep to enable horizontal movement for assembly of the joints. After fitting I've filled in the joints with mortar.
I used to same technique on the brick wall at the other end.
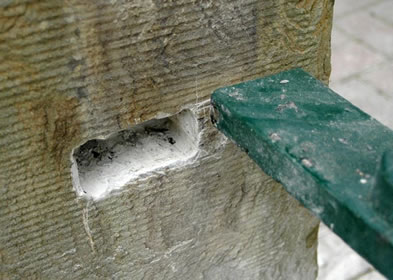
Setting Iron Railings in Stone with Lead
I only had one of these to do on a support boss. The principle would work on any similar joint or post.

I cleaned the old lead off the boss with a small cold chisel. The socket in the stone I cleaned out with a combination of a drill and chisel.

When the railings and the stone are set in the right place, it's time to cast in some lead. The bit of a tin makes a channel to pour the lead in.

Cut up bits of lead were put in a cut up beer can and melted over a primus stove.

The lead flowed nicely, filling the void and flowing to the other side. I was concerned that the lead would cool before it had flowed around.
Lifting and Positioning Iron Railings
I case your wondering how I managed to manoeuvre and position the railings complete with stones:

It took a while to think it through. The solution was quite simple with a couple of car jack and planks. The straps supported the stones as it was positioned. The wedges are used to adjust and levels the heights. With this set up I could move everything slowly and accurately.
Salvaged Railings make a big Impression
It's often said that that first impressions count. This often results in the front door getting great deal of attention ( I'm working on my door here). However railings like these are really eye catching. For a start they look good and right. More importantly it's so unusual, all the others got removed during the war. It really stands out when you see them now.

I hope you've found this interesting, any thoughts or questions on this please leave a comment here