

Steps for Zimmer Frame Access
How to make temporary, wide, half steps for zimmer or walking frame, disabled access.
A very simple construction to adapt steps for zimmer frame access. I knocked these up in an evening to allow my Dad to get in and out of his house. The steps to the front door are too high and not deep (tread depth) enough to allow zimmer frame access. These zimmer steps are a temporary measure whilst his leg heals, without them he would be trapped in the house for possibly months.

This little project to make safe zimmer frame access steps is cheap and doesn't need much skill to complete. If you aren't the DIY'er I'm sure some one could help you out locally.
The Problems with Zimmer Frames and Steps
Tread Depth – Standard steps are designed for feet so aren't usually deep enough to take all four feet of a Zimmer frame. Without the four point contact, the frame won't give the stability for safe access.
Step or Riser Height – A standard riser or step height is often 8 inches or around 200mm. It's too much for safe Zimmer Frame access.
The Design for Zimmer Frame Steps
With these two problems in mind we worked out what was needed to give safe and comfortable zimmer frame access up and down the steps. Re-assuringly this was later confirmed by the Physiotherapist who visited a few day later.
The steps need to be at least 550mm deep (from front to back), the closer to 600mm the better. The step (riser height) should be no more than around 4 inches, 100mm. I also decided the steps should be 3 feet, 900mm wide and have a non slip surface. They also need to be very stable, a bit of a challenge as the ground in-front of the existing step is a two way slope.
Construction of the Zimmer Frame Steps
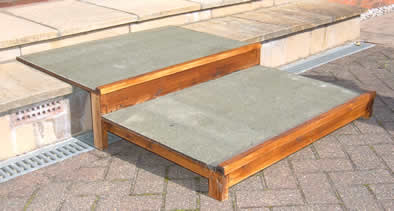
It had to be quick and cheap construction. The steps are only temporary so I didn't want to go overboard. The treads are 12mm exterior grade ply with roofing felt glued on top, giving a non slip weather proof surface. The frame is timber 38 x 50 sawn and a 38 x 90mm for the riser.
The frame has screwed and glued (PU adhesive) butt joints with a centre cross brace in the middle of the step. The frame is screwed to the plywood top. The legs are screwed and glued to the frame and plywood. I made the legs over sized so I could cut them down on site to suit the sloping ground.
To finish off the front of each step I added an “L” section to stop the roofing felt from being damaged and to make a small lip. The lip will help stop the wheels on the front of the zimmer frame from accidentally slipping off the step.
That's how I made them, I'm sure anyone with a little DIY / joinery knowledge will come up with their own details to suite their particular situation.
Fitting the Zimmer Frame Steps
The top step has to fit flat on the existing step so the legs need to hold the bottom step at the right height. So I had to cut the oversized steps exactly to fit with no wobble.
I put blocks under the top step and supported the bottom step off the ground. Using a block the same size as those under the top step, I marked each leg. With each leg sawn off at the marks and the blocks removed everything sits perfectly.
It does the job perfectly and even though it's only designed as a tempory structure it will last much longer than it will take my dads leg to heal. He can get out of the house now and enjoy a change of scenery.
If you have any comments, suggestions or queries please click to the zimmer steps blog entry
For lots of useful info on Disability aids etc. have a look at: Ableize - has disability and mobility covered