

Cutting Weight Pockets for Timber / Wooden Sliding Sash Windows, Double Hung Windows.
I've, done a little video showing how I've cut the weight pockets for my Sliding Sash / Double Hung Windows. In my research about old sash window design and construction, I came across a pocket cutting chisel and wondered if made the job any easier than using tools from my modern armoury. My Conclusion YES IT DOES.
Notes about the Sash Window Pocket Cutting Video
-
If you know all about weight pockets then the interesting bit comes about half way through the video, so skip the first half.
-
I had a bit of a brain malfunction at the time, the more acceptable design is shown below.
-
Since recording I've discovered a bit more about the chisel and how it was used, also below.
Pockets for Sliding Sash, Double Hung Windows
In brief, the pockets are an opening in the Pulley Stiles allowing access to the weight boxes. Access is needed to install the counter balance weights and for future maintenance, re-cording etc. in the future.
The Pockets or openings need a cover that fits perfectly giving a flat surface for the sashes to run against with no protrusions inside the weight box that will snag against the weights.
The most accepted, traditional design of pocket and pocket cover is ellegant, efficient design. The timber taken out to make the pocket is re-used as the cover. The way it was traditionally cut is easy and quick.
The Generally Accepted Design of Sliding Sash Pockets.
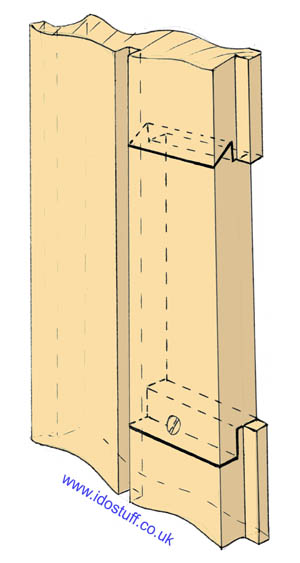
Sliding Sash / Double Hung Weight Pocket Design
I say “generally accepted”. (different from the video) Please feel free to disagree, any comments please visit this Sliding Sash Blog Post to add your thoughts and see what others think.
The angle at the top holds the top of the pocket cover in place. The bottom is commonly held with a screw. It could also be held in just with the parting beading bead and staff bead , but that doesn't hold the cover up so it's wedged in tight.
Reason for the Sash Pocket Cutting Experiment
The perpendicular cuts and angle cuts are, these days, are sawn with a tenon / dovetail saw or a power tool such as a fein multimaster. The rest of the joint is actually split, a little tap is all that's needed after saw cuts have been made.
I tried originally tried using a tenon saw but found it difficult. The cuts have to stop at the parting bead slot so getting a stroke on the saw is awkward to say the least. More of push down and draw back is needed.
During my research I came across references to short but wide and thin Pocket Cutting Chisels. How they were used and how much easier it would be, was however a mystery. After a forum discussions here …. and an interest in old techniques, I gave it a go.
Video - Replicated Pocket Cutting Chisel
Improvement On Sash Pocket Cutting with a Chisel
Go for the design detailed above, although the form I used in the video works well, in theory the above design should be a bit easier and possibly function better.
Saw Cut first! Diagonally up to the parting bead slot. This is easy enough with full stroke of the saw. The surface is in less danger of inadvertent damage and the angles easier to control. The chisel is used square off the rest of the cut, up to the parting bead slot.
A double edge on the blade will stop the angle of entry changing.
I'll try the improvements on the next windows I make and report back. In the mean time I've cut ten pockets this way and you can see by the video how quick it was.
Please let me know on this Sliding Sash Window blog post if you have any thoughts on this technique.
Back to the Sash Window Index Page