

Retrofitting a Structural Beam and Column for Our Cottage Renovation
 This page explains in detail how to fit a timber beam and column in an existing building. Its just one of jobs for Whitby Cottage renovation. Page one of this job is here, where you can get the low down on why we needed a new beam rerofitting
Cutting And Fitting the beam to Suit the existing Walls
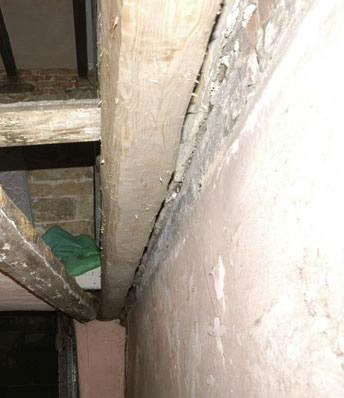
I had already prepared one socket for one end of the beam, reasonably square and flat bottomed. The other end had to go in to a rough cavity. Squaring this would have meant cutting and chiselling stone work that was best undisturbed. This hole should not have been there in the first place but I was happy to take advantage of it being there.
To get a good bearing surface for the beam end I had to shape the beam to fit. This took five attempts offering up, lifting back down, shaping, refitting, lifting back down, reshaping. If the beam had been any heavier or I hadn’t got any help with me, it would have needed a much more thoughtful approach.
Bedding the Beam in Place
Before final fitting of Beam the ends where soaked in a preservative and water repellent mixture. To ensure the load on the ends is spread evenly down to wall, I used thin layer of lime and soft sand cement. After lifting and fitting the beam back in place for the last time I made sure the cement was packed well under it.
Footings / Foundation for the Column
 The column will be taking some of weight of the bathroom so it needed a stable footing, just resting it on the stone flags would be reliable. I cut a neat hole approximately 10 x 8 inches through the flag stone with a diamond blade on an angle grinder and broke through with a chisel. Then excavated underneath through 8” of sand and in to about 4” of compacted clay. I undercut the flagstone so the base of hole was about 18” square. This will give a good area to spread any load so the column has a solid base.
To be reliable any footing or foundation needs to be well compacted. I first compacted the clay by hammering a 3 x 3” piece of timber on to it. This will have closed up any fractures In the clay caused by the excavation. There is a difficulty compacting clay because it tends to squidge around so for proper compaction it needs a layer on top that will consolidate properly. The proper material would be “hardcore” or to be technical Granular sub-base classified as MOT1 or GSB1. But for this job I crushed up the cut out bits of flag stone plus a bit more stone. This I added in layers and again hammered down.
Next came a bucket full of stiff concrete mix, hammered down and in to the sides of hole to make a solid base that would be about 3” below the base of the column.
Cutting the Mortise and Tenon to join the Column to the Beam
 This is where it get a bit tricky, the beam and column are not perfectly square so the process of marking out has to be done in stages by offing the two pieces up and scribing the joints.
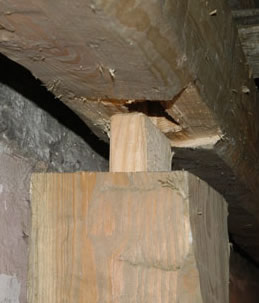
This is all possible because of 3” clearance in the hole. The column will have a 2 ½” tenon going in to a blind mortise and so the column at this stage fits under the beam and will have to be lifted up rather than the beam dropped down on to it.
The first stage of the joint is getting a flat faced area on the beam where the column meets it. Then scribing / measuring down from this to mark the shoulder of the tenon on the column. The flat face on the beam is cut far enough in to take away the chamfered / waney edge so the joint will have a neat flat front.
 Cutting the mortise upside down
With the two pieces now meeting its possible to mark out the mortise and tenon together. Whats not so easy is cutting a mortise upside down. Most of the material is removed with drill bits and then parred back to the finished size with a chisel. Despite the aching arms and a cricked neck , working this way, gravity clears the hole out, an advantage outweighed by a constant face full of debris.
Cutting and fitting the Tenon
 Cutting the tenon is perfectly simple with a hand saw. Final adjustments of the joint are a little more difficult as the joint could do with being good and tight, but it can’t be hammered together.
The solution came from two heavy duty ratchet tie down straps. These are looped under the column and around the beam so the joint can be ratcheted together. With just a few shavings off the tenon the joint was complete.
Although far from being necessary I glued the joint. It will also have a peg in it.
Concreting the base of the Column
I pre-soaked the column base in the waterproofing / preservative mixture. Then wrapped a thick plastic bag around it as a damp proof membrane.
A Lime concrete mix is then troweled in around and under the column. This needs to be well consolidated by rodding / vibrating all the way round as the concrete is put in in layers. The surface is finished slightly above the flag stones so and water is shed away from the column. The bag can be trimmed back once the concrete has set.
The last bit to do is to fully bed the beam end in the rough hole. The cavity above the beam was quite large so I filled it with lime concrete. To get this well compacted in I bodged up some temporary shuttering leaving a gap at the top to get the concrete in. The same gap is used to pack and vibrate the concrete with a rod.
So we now have a solid timber beam ready to build a new floor on.
Your comments, suggestions or question ar most welcome over on the blog
For more about the Cottage Renovation start here
To keep in touch with progress "like" the iDoStuff facebook page, link at top of this page.