

Front Door Mortise Marking and Cutting
I've already cut the tenons. Have a look at the previous page
I know some folks like to cut the mortises first and mark off the tenons from them however I find it easier and more accurate this way round.
Accurate Marking Out of Mortises
The principle I stick to is DONT USE MEASUREMENTS. Every time I measure and every time I mark a measurement is an opportunity to introduce an error. These errors can soon add up!
In cutting the tenons on the rails, I've not had to make any accurate measurements and I don't intend to start now. In marking out the mortises I only need the overall door height and the size of the glazed portion (equates to the length of the top muntin).
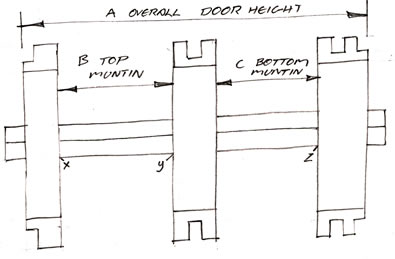
A = Overall door height
B = Top muntin (worked out previously using the the golden ratio)
C = Bottom muntin (whatever the distance is)
Step 1. Cut and Tenon the Muntins
With the rails laid out on the stiles laid out the length of the muntins can be marked out + 30mm for the tenons. Then the little 15mm blind tenons can be cut (same way as I cut the other tenons).
Step 2 . Marking Mortise Extents
Lay the stiles and the rails out again, this time USE THE MUNTINGS to space the rails (so any marking and cutting discrepancies are taken in to account). Mark across the rails at x, y and z.
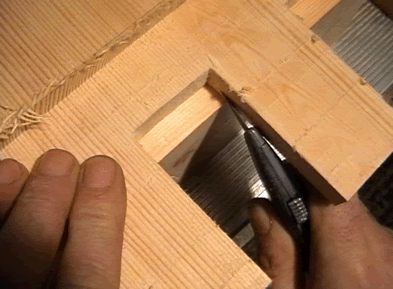
Step 3. Marking the Mortise.
Each tenon can now be used as a template to mark out the corresponding mortise.
Step 4. Marking rails for the blind mortises.
This did need a measurement because the mutins need to be joined in the middle of the rails. Watch the video to see how I didn't need to be spot on accurate.
The only other dimension needed is the depth of the mortice to take the haunch. This needs a bit of clearance (2mm in my case) to ensure the it doesn't stop the joint coming together fully when its full of glue.
Cutting the mortices
For me this is case of setting up the mortising machine. Watch the video to see how I got on.
And YES next time I'll measure what will fit in it first.. Doh.
As the middle rail and bottom rail don't fit in the mortising machine the video also shows my “Super Speed” hand cut mortise.
Next - FOX WEDGING. Not many folks seem to use this technique but its easy and saves some time.
Comments please pop to the blog to leave comments or let us know if there's a better way.
How to Make a Timber Door
Part 1. Timber Exterior Door Design
Part 2. DIY External Door Design and Proportions
Part 3. Tenon Theory and Cutting
Part 4. Mortise Marking and Cutting
Part 5. Fox Wedging Mortise and Tenon Joints
Part 6. Raised Panels on the cheap
Part 7. Routered Mouldings and Fitting